Compass Calibration
This article explains how to perform basic compass calibration.
Note
This article assumes that you are using the most common configuration — a flight controller and compass mounted with the arrow on each facing toward the front of the vehicle. If you’re using a different configuration see Advanced Compass Setup.
Calibration first steps
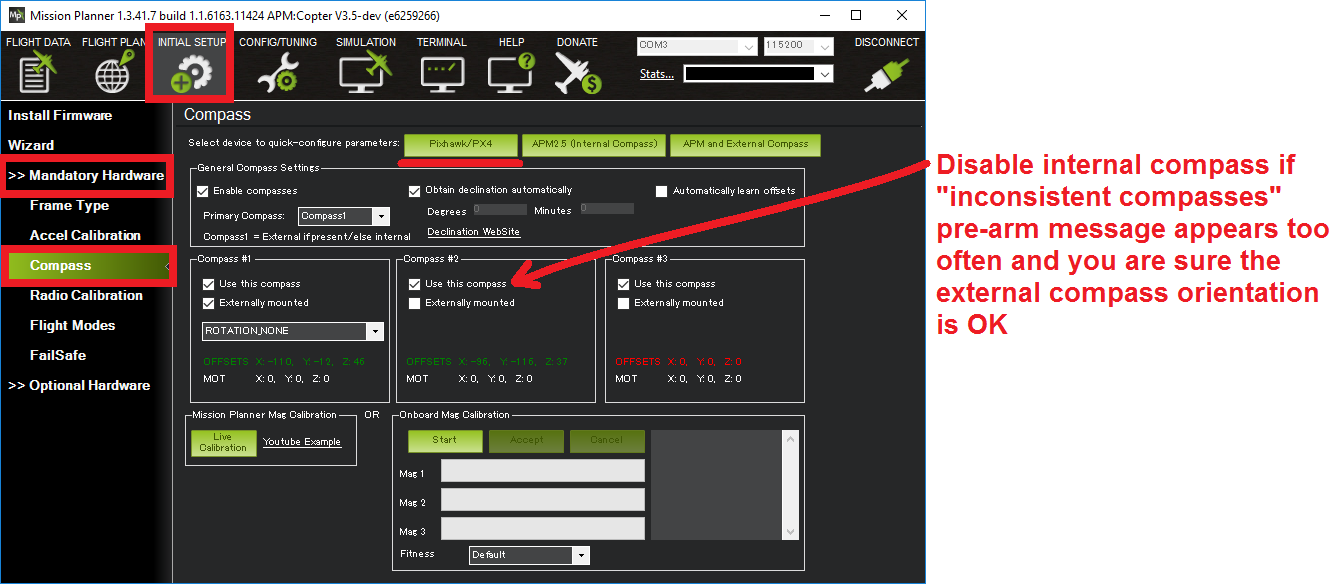
Under Initial Setup | Mandatory Hardware select Compass.
Select your flight controler configuration to automatically enter the most important configuration information for your board:
- For any modern flight controller (Pixhawk, NAVIO2, etc) select the button Pixhawk/PX4.
- For APM 2.6, select APM with External Compass.
You normally shouldn’t need to change any of the “General Compass Settings” or compass specific values (i.e. “Compass #1” section), but you might want to confirm that the Enable compasses and Obtain declination automatically boxes are checked.
You may wish to disable Compass #2 (the internal compass) if you are seeing the dreaded “inconsistent compasses” pre-arm message often and you are sure that the external compass’s orientation is correct.
Onboard Calibration
Copter-3.4 (and higher) supports “Onboard Calibration” meaning that the calibration routine runs on the flight controller. This method is more accurate than the older “Offboard Calibration” (aka “Live Calibration”) which runs on the ground station because in addition to offsets, scaling is also calculated.
To perform the onboard calibration:
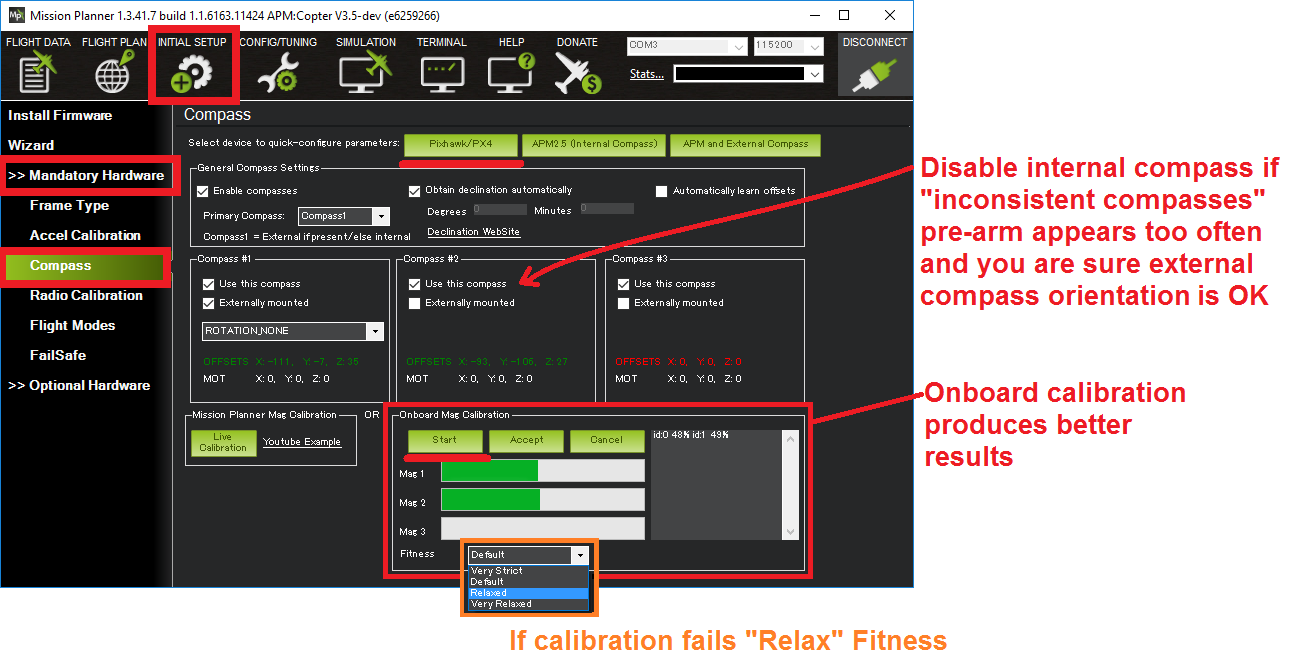
click the “Onboard Mag Calibration” section’s “Start” button
if your flight controller has a buzzer attached you should hear a single tone followed by short beep once per second
hold the vehicle in the air and rotate it so that each side (front, back, left, right, top and bottom) points down towards the earth for a few seconds in turn
as the vehicle is rotated the green bars should extend further and further to the right until the calibration completes
upon successful completion three rising tones will be emitted and a “Please reboot the autopilot” window will appear and you will need to reboot the autopilot before it is possible to arm the vehicle.
If calibration fails:
- you will hear a failure tone and the green bars may reset to the left and the calibration routine may restart (depending upon the ground station)
- if, after multiple attempts, you are unable to calibrate the compass, Press the “Cancel” button and change the “Fitness” drop-down to a more relaxed setting and try again.
- if compass calibration still fails it may help to raise COMPASS_OFFS_MAX from 850 to 2000 or even 3000
Onboard Calibration using Stick Gestures (no GCS)
Copter-3.4 (and higher) supports “Onboard Calibration using RC Controller stick gestures” meaning that the calibration routine runs on the flight controller with no GCS. This method is more accurate than the older “Offboard Calibration” (aka “Live Calibration”) which runs on the ground station because in addition to offsets, scaling is also calculated.
requires RC calibration first
to start compass calibration hold throttle stick full up and full right yaw for 2 seconds
if your flight controller has a buzzer attached you should hear a single tone followed by short beep once per second
hold the vehicle in the air and rotate it so that each side (front, back, left, right, top and bottom) points down towards the earth for a few seconds in turn
upon successful completion three rising tones will be emitted and you will need to reboot the autopilot before it is possible to arm the vehicle.
If calibration fails:
- you will hear a failure tone and the calibration routine will restart
- to cancel calibration at anytime hold throttle stick full up and full left yaw for 2 seconds
- if, after multiple attempts, you are unable to calibrate the compass, Cancel with stick and use normal Onboard Calibration from GCS above
Offboard Calibration (aka “Live Calibration”)
Older versions of ArduPilot rely on the ground station to calculate the compass offsets. To use this older method:
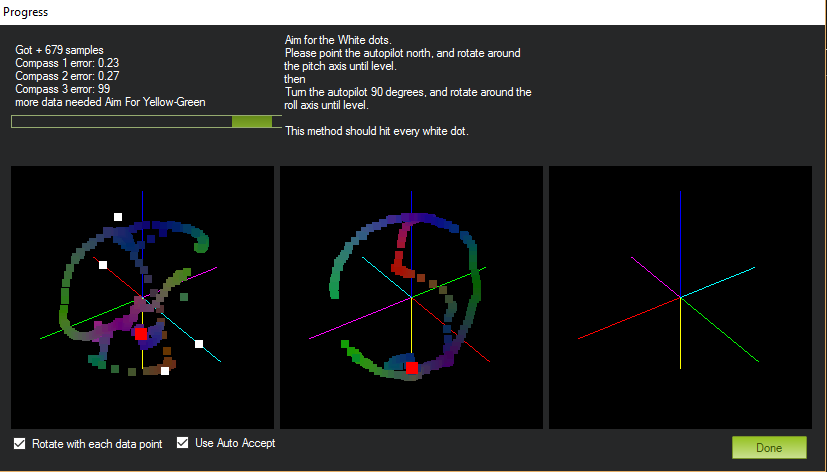
Click the Live Calibration button.
The aim is to rotate the vehicle so that the coloured trail hits each of the white dots. One way to do this is to hold the vehicle in the air and rotate it slowly so that each side (front, back, left, right, top and bottom) points down towards the earth for a few seconds in turn.
The calibration will automatically complete when it has data for all the positions. At this point, another window will pop up telling you that it is saving the newly calculated offsets. These are displayed on the main screen below each associated compass.
Note
- In Copter-3.2.1 and later offsets are considered acceptable
provided their combined “length” is less than 600 (i.e. sqrt(offset_x^2+offset_y^2+offset_Z^2) < 600). Prior to Copter 3.2.1 the recommendation was that the absolute value of each offset be less than 150 (i.e. -150 < offset < 150).
Additional information
More information about compass configuration can be found in Advanced Compass Setup. This includes instructions for how to set up additional compasses, non-standard compass alignments, compassmot, etc.
General discussion on magnetic interference and ways to reduce it can be found in Magnetic Interference.


