Simple GeoFence
Overview
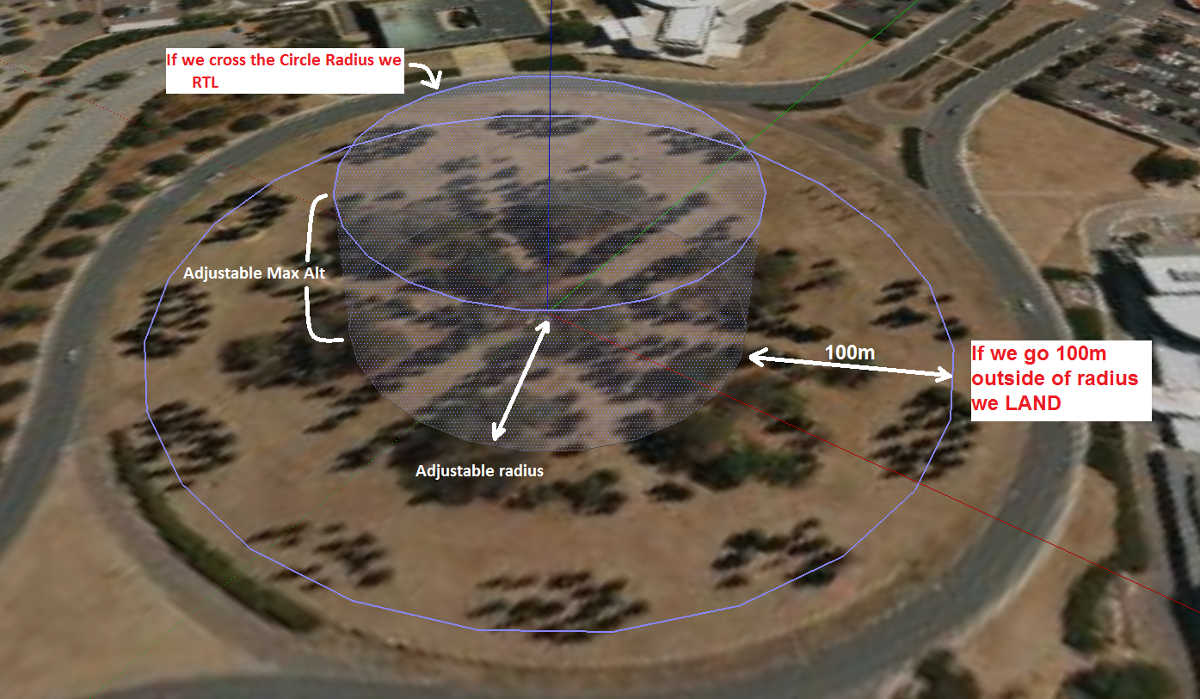
AC 3.0.1 (and higher) includes a simple “tin can” shaped fence centered on home that will attempt to stop your copter from flying too far away by stopping at the fence (if in Loiter mode and using Copter-3.4 or higher) or initiating an RTL. The maximum circular distance and altitude and the vehicle behaviour when the fence is reached can be configured using Mission Planner.

If the vehicle strays outside these borders it will switch into RTL or LAND. At the moment the fence is breached a backup fence is erected 20m further out (or up). If the copter breaches this backup fence (for example if the the vehicle is not set up correctly or the operator takes control but is unable to bring the copter back towards home) the copter will be switched into RTL again (and another backup fence an additional 20m further out will be created).
If the copter eventually flies 100m outside the configured fence distance, the vehicle will switch into LAND mode. The idea being that it’s clearly impossible to get the copter home so best to just bring it down. The pilot can still retake control of course with the flight mode switches. Like with the earlier fences, another fence is erected 20m out which will again switch the copter to LAND if it continues away from home.
Enabling the Fence in Mission Planner

The Fence can be set-up by doing the following:
- Connect your flight controller to the Mission Planner
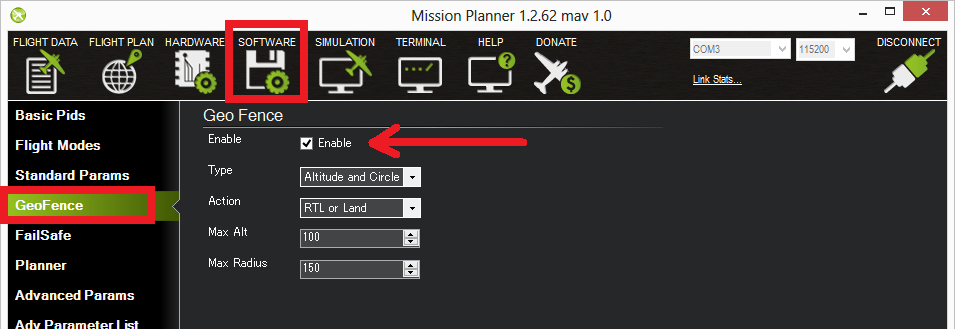
- Go to the Config/Tuning | GeoFence screen
- Click the Enable button
- Leave the “Type” as “Altitude and Circle” (unless you want only an Altitude limit or only a Circular fence in which case you can select “Altitude” or “Circle”)
- Leave the Action as “RTL or Land”
- Set “Max Alt” to the altitude limit you want (in meters)
- Set “Max Radius” to the maximum distance from home you want (in meters). This should normally be at least 50m
Enabling the fence with Channel 7 or 8
It is not necessary to set-up a switch to enable or disable the fence but if you wish to control the fence with a switch please follow these steps:
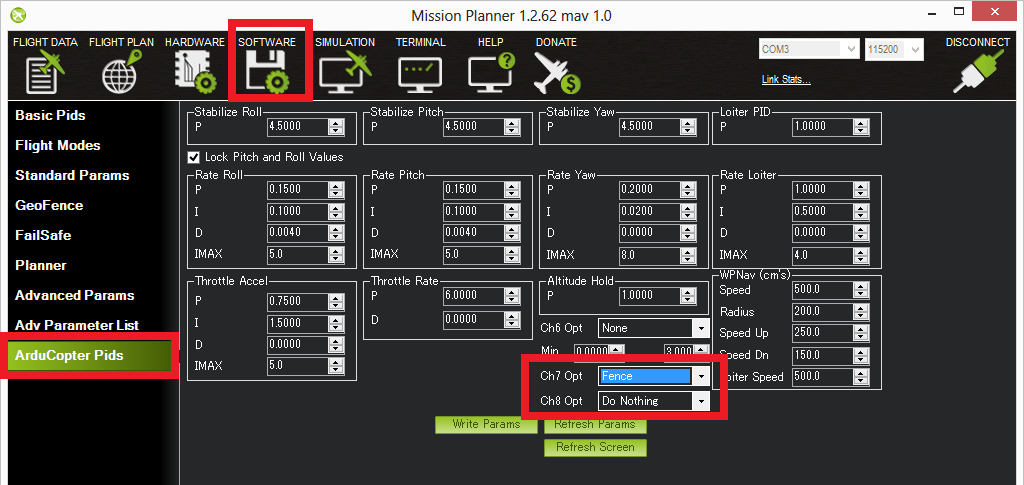
- Go to the Mission Planner’s Config/Tuning > Extended Tuning screen and set either “Ch7 Opt” OR “Ch8 Opt” to Fence.
- holding the switch high (i.e. PWM > 1800) will enable the fence, low (under 1800) will disable the fence.

Warnings:
- The minimum recommended fence radius is 30m
- The fence requires the GPS to be functioning well so do not disable the GPS arming check nor the EKF failsafe while the fence is enabled. Conversely if you disable either of these checks, disable the Fence.
- For the best results, ensure RTL is working on your vehicle.
- With the Fence enabled, the pre-arm checks will require you have GPS lock before arming the vehicle.
- If GPS failsafe is not enabled and the Fence is enabled and you lose GPS lock while flying the fence will be disabled.
- If GPS failsafe is enabled and the Fence is enabled and you lose GPS lock while flying the vehicle will switch to LAND because we no longer know the vehicle position and we want to ensure the copter never travels far outside the fence. This behaviour will occur regardless of the flight mode. If a LAND sequence is not desired, the pilot can retake control by moving the flight mode switch.
- The backup fences are created 20m out from the previous breached fence not 20m out from the vehicle’s position. This means if you choose to override the fence you may have less than 20m to regain vehicle control before the fence switches the copter to RTL (or LAND) again. If you really want to override the fence, you should be ready to switch the flight mode twice or alternatively set-up the enable/disable fence switch.